
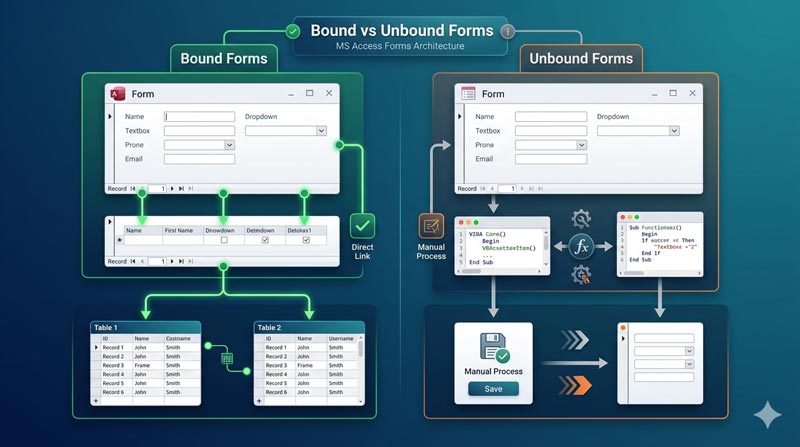
When you start building forms in MS Access, you’ll quickly run into a choice that many beginners don’t even know exists: should your form be bound or unbound? Most tutorials skip right past it, but the decision you make here shapes how your entire database behaves — how data gets entered, how it gets saved, and how much control you have over the whole process.
This guide, based on the Skill Header tutorial “What is Best for Access Form Control | Bound Vs Unbound Forms,” walks through all three form control methods in plain English so you can make the right choice for your own database.
What Is a Form in MS Access?
Before getting into bound vs unbound, let’s quickly cover what a form actually is. A form is the interface people use to enter, view, and edit records in your database. Instead of typing directly into a table (which is messy and error-prone), a form gives you a clean, structured screen to work with.
Access gives you different ways to build that interface — and the method you choose affects everything from how the form looks to how the data gets saved.
Method 1: Single Bound Form
A bound form is connected directly to a table or query. The moment you open it, Access loads data from the table into the form’s fields automatically. When you make a change and move to the next record or close the form, Access saves that change automatically — no button needed.
A single bound form shows one record at a time. You can scroll through records one by one using the navigation buttons at the bottom of the form.
How to create one
The quickest way is through the Form Wizard. Pick your table, select the fields you want, and Access builds the form for you. Each field on the form is tied (bound) to the matching field in the table.
Best for: Simple databases where users need to browse and edit records one at a time.
Method 2: Continuous Bound Form
A continuous bound form is the same as a single bound form in terms of how it connects to data — it’s still bound to a table or query — but it shows multiple records at once in a repeating list layout.
You set this up by changing the form’s Default View property to “Continuous Forms.” The form then repeats its controls (text boxes, combo boxes, etc.) for each record, stacked one below the other, like a scrollable list.
Best for: Displaying lists of records where users need to scan or make quick edits across many rows.
Method 3: Unbound Form
Here’s where things get more interesting. An unbound form has no record source. It is not connected to any table or query. The form opens blank, and nothing gets loaded or saved automatically.
Instead, you fill the fields using code and save the data by clicking a Submit button — which runs a VBA script that checks the fields and writes the data to the table only when you tell it to.
Think of it like filling out a form on a website. You fill everything in, review it, then click Submit. Nothing happens until you’re ready.
How it works
In the form’s properties, the Record Source is left empty. Each text box, combo box, or other control on the form is also unbound — not tied to any table field. When the user clicks Submit, a VBA procedure runs that:
- Checks that mandatory fields are filled
- Shows an error message if something is missing
- Writes all the values to the table using an INSERT operation
- Closes the form once everything is saved successfully
Best for: Any database where data accuracy matters, users need a clear confirmation step before saving, or where complex validation logic is needed.
A Practical Example: Employee Entry Form
To make this concrete, the tutorial builds an Employee table with fields like name, department, join date, salary, allowance, and a calculated total salary field.
All three form methods are built on top of this same table so you can see exactly how each one behaves differently in practice.
With the single bound form, you open it and the first employee’s data appears immediately. Change the salary and click away — it’s saved.
With the continuous bound form, you see a list of all employees. You can scroll through and edit any row directly.
With the unbound form, you open a blank form. Nothing is loaded. You fill in the employee’s details from scratch. Until you click Submit, nothing touches the table. If you forget to fill in a required field, a message box tells you what’s missing. Only once everything is correct does the record get added.
Why Unbound Forms Are Worth the Extra Effort
If you’ve used Access for a while and built mostly bound forms, switching to unbound might feel like extra work for no reason. But there are real benefits once your database grows:
No accidental saves. With a bound form, navigating away from a half-filled record saves it. With an unbound form, that can’t happen.
Validation before anything is written. You can check all fields together before any data touches the table. With bound forms, you have to use form events (like BeforeUpdate) to intercept saves — which is messier.
Cleaner user experience. A Submit button feels natural and familiar. Users know exactly when they’re committing data.
Custom workflows. Need a form that loads data from one table but saves to another? Or a multi-step entry process? Unbound forms handle this cleanly. Bound forms struggle.
Audit and logging control. With unbound forms, you can add logging code into the Submit event — recording who saved what and when — without fighting against Access’s automatic save behaviour.
Quick Comparison
| Feature | Single Bound | Continuous Bound | Unbound |
|---|---|---|---|
| Connected to table? | Yes | Yes | No |
| Shows records automatically? | Yes (one at a time) | Yes (multiple) | No |
| Saves automatically? | Yes | Yes | Only on Submit |
| Requires VBA code? | No | No | Yes |
| Validation control | Limited | Limited | Full |
| Best for | Simple entry | Lists/admin | Custom workflows |
Which One Should You Choose?
There’s no universal right answer — it depends on what you’re building.
If you’re putting together a quick internal database and the main job is entering and editing records, a bound form gets you up and running fast with almost no code.
If you need to display a long list of records with quick inline editing, a continuous bound form is the right tool.
If you’re building something that will be used regularly by others, where data accuracy is important and the experience needs to feel polished, invest the time in an unbound form. The extra code is manageable, and the results are noticeably better.
Most experienced Access developers land on unbound forms for anything beyond the basics — and once you’ve built one, the pattern becomes easy to repeat.
Watch the full tutorial on YouTube: What is Best for Access Form Control | Bound Vs Unbound Forms by Skill Header. Download the open-source practice file at skillheader.com.