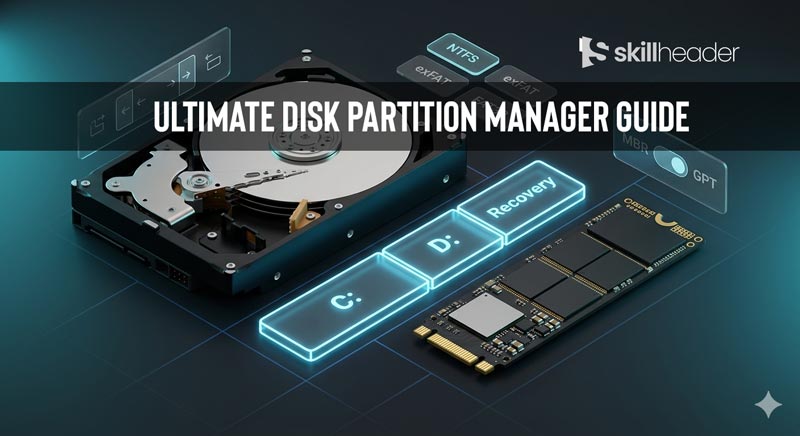
Whether you’re setting up a brand-new PC, dual-booting Linux alongside Windows, or rescuing data from a failing drive, understanding how to use a disk partition manager is one of the most valuable skills any computer user can have. This guide breaks down everything — from what your storage hardware actually is, to the best software tools available today.
Managing disk partitions might sound intimidating, but it is fundamentally just about organizing your storage drive into logical sections — similar to dividing a large warehouse into separate rooms. Each room can have its own rules, file system, and purpose. The right partition manager software makes this process visual, safe, and surprisingly simple.
Let’s start from the ground up.
Understanding Your Storage: HDD vs SSD
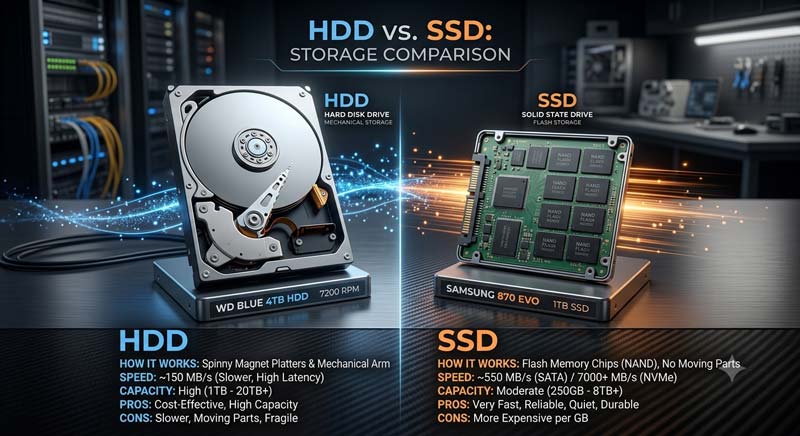
Before you can effectively manage your disk, it helps to understand what kind of storage device you are actually working with. The two dominant types are Hard Disk Drives (HDD) and Solid-State Drives (SSD), and they differ quite significantly in how they work and what they are best suited for.
Hard Disk Drive (HDD)
A traditional HDD stores data on one or more spinning magnetic platters. A tiny read/write head floats nanometers above the platter surface and accesses data mechanically. This electromechanical design has been around since the late 1950s and remains popular because it offers very large storage capacities at a relatively low cost per gigabyte.
HDD Pros
HDD Cons
Solid-State Drive (SSD)
An SSD uses NAND flash memory chips with no moving parts. Data is stored and retrieved electronically, making SSDs dramatically faster, more durable, and quieter than HDDs. Modern NVMe SSDs connected via the M.2 slot can achieve sequential read speeds exceeding 7,000 MB/s — over 35 times faster than a typical HDD.
SSD Pros
SSD Cons
Pro Tip: The sweet spot for most users in 2026 is a combination: an SSD (250–500 GB) as the system/OS drive for speed, paired with a large HDD (1–4 TB) for data, media, and backups. A good partition manager works seamlessly with both drive types.
What Is Disk Partitioning — And Why Does It Matter?
Disk partitioning is the process of dividing a physical storage drive into one or more separate logical sections called partitions. From the operating system’s perspective, each partition behaves like an entirely independent drive, even though they all live on the same physical disk.
Think of a blank hard drive or SSD as an empty plot of land. Partitioning is like drawing property boundaries and deciding: this section will be the OS, that section will be for personal files, and that corner will be for backups. Each section can then be formatted with its own file system and assigned a drive letter.
Why Partitioning Is Necessary: Key Advantages
1
Organize Your Data Logically
Separating the OS (C: drive) from personal data (D: drive) keeps your system clean. If Windows crashes and needs a reinstall, your data on the D: partition remains untouched.
2
Run Multiple Operating Systems
Dual-booting Windows and Linux requires separate partitions for each OS. A partition manager is essential for safely carving out space without destroying your existing setup.
3
Improved Security & Isolation
Storing sensitive files on a separate, encrypted partition adds a layer of security. If one partition becomes infected with malware, others may remain clean.
4
Better Backup & Recovery Strategy
You can back up individual partitions rather than an entire drive, making backups faster and more targeted. OS recovery partitions are a prime example of this.
5
Optimized Performance Per Use Case
Different partitions can use different file systems optimized for their purpose — for example, a fast-access cache partition versus a large storage partition formatted for maximum compatibility.
6
Prevent OS Fragmentation from Affecting Data
When the OS and user data live on separate partitions, OS-level disk fragmentation is isolated and easier to manage without touching your files.
File Allocation Systems: FAT32, NTFS, and exFAT Explained
When you create a partition, you need to format it with a file system — the underlying structure that determines how data is organized, stored, and retrieved on that partition. The three file systems Windows users encounter most often are FAT32, NTFS, and exFAT. Choosing the right one matters more than most people realize.
FAT32
The Universal but Aging Standard
FAT32 (File Allocation Table, 32-bit) was introduced with Windows 95 OSR2 in 1996 and remains one of the most universally compatible file systems ever created. Virtually every device — cameras, game consoles, car stereos, smart TVs — can read a FAT32 drive with no special drivers. However, it comes with two crippling limitations for modern use: a maximum file size of 4 GB per file, and a maximum partition size of 32 GB when formatted from Windows (though third-party tools can go higher, up to 2 TB technically). These constraints make FAT32 impractical for modern video files, disk images, and virtual machines.
NTFS
Windows’ Powerhouse File System
NTFS (New Technology File System) has been the default Windows file system since Windows XP (2001) and remains so today. It eliminates FAT32’s size limitations almost entirely — supporting individual files up to 16 TB and partitions up to 256 TB. More importantly, NTFS introduced critical enterprise-grade features: file permissions and access control, journaling (which helps recover from sudden shutdowns), built-in compression, encryption (via EFS), disk quotas, and symbolic links. For any Windows system drive, NTFS is the only sensible choice.
The one downside of NTFS is limited cross-platform compatibility — macOS can read NTFS drives natively but cannot write to them without third-party software, and Linux support while available requires specific drivers or packages.
exFAT
Windows’ Powerhouse File System
exFAT (Extended File Allocation Table), introduced by Microsoft in 2006, was designed explicitly to fill the gap between FAT32 and NTFS. It removes FAT32’s 4 GB file size limit and 32 GB partition ceiling, supporting files up to 16 EB (exabytes) in theory, while remaining far more cross-platform compatible than NTFS. macOS, Linux, Android, and modern Windows all support exFAT natively. This makes it the go-to format for large USB flash drives, SD cards, and portable external drives that need to be used across different operating systems. It lacks NTFS’s advanced security features, but for external portable storage, it’s often the ideal choice.
| Feature | FAT32 | exFAT | NTFS |
|---|---|---|---|
| Max File Size | 4 GB | 16 EB (theoretical) | 16 TB (practical) |
| Max Partition Size | 32 GB (Windows) / 2 TB (3rd party) | 128 PB | 256 TB |
| Windows Support | Full | Full | Full |
| macOS Support | Read + Write | Read + Write | Read Only |
| Linux Support | Full | Requires driver | Read-only (native) |
| Journaling | No | No | Yes |
| File Permissions | No | No | Yes (ACL) |
| Best Use Case | Legacy devices, small USB drives | External drives, SD cards, USB | Windows system drives, internal storage |
MBR vs GPT: The Partition Table Architectures
Before any partitions can exist on a disk, the drive needs a partition table — a blueprint stored at the very beginning of the disk that records where each partition starts and ends. There are two competing standards: the old MBR and the modern GPT.
MBR (Master Boot Record)
The Master Boot Record scheme dates to 1983 and was designed for IBM PC-compatible computers using BIOS firmware. The MBR is stored in the very first 512-byte sector of the disk and contains both the partition table and the initial boot code. Its fundamental limitations reflect its age:
Despite these limitations, MBR is still used on older hardware, bootable USB drives for legacy systems, and drives under 2 TB that need maximum compatibility with older machines.
GPT (GUID Partition Table)
The GUID Partition Table is the modern replacement, developed as part of the UEFI specification and introduced with Windows Vista (64-bit) and macOS Intel Macs. GPT addresses every major MBR limitation:
| Feature | MBR | GPT |
|---|---|---|
| Max Disk Size | 2 TB | 9.4 ZB |
| Max Partitions | 4 primary | 128 (Windows) |
| Redundancy | None (single copy) | Header + backup at disk end |
| Firmware Required | Legacy BIOS | UEFI (preferred) |
| Windows 11 Compatible | No | Yes (required) |
| Recovery Capability | Poor | Excellent |
How Disk Partitioning Works: From DOS Commands to Modern GUIs
The mechanics of partitioning have evolved enormously over the decades — from cryptic text commands to point-and-click graphical interfaces that make the whole process visual and intuitive.
The Old Way: DOS-Based FDISK and diskpart
In the early days of PC computing, the primary tool for partitioning was FDISK — a command-line utility bundled with MS-DOS and early Windows versions. Using FDISK required memorizing command syntax, understanding partition types by number, and navigating confusing menus with no visual feedback. One wrong keystroke could destroy a partition table. The experience was intimidating enough that most home users avoided touching it entirely.
Windows NT and later Windows versions introduced diskpart, a more powerful command-line disk management tool that persists to this day. It is still used by IT professionals and system administrators for scripted, automated disk operations. Commands like diskpart → list disk → select disk 0 → create partition primary get the job done, but require precision and carry real risk if used carelessly.
The Modern Way: Graphical (GUI) Partition Managers
Modern GUI-based partition managers transformed disk management from a specialist skill into something any user can approach. These tools display your physical drives and partitions as visual blocks — color-coded bars showing partition sizes, free space, and file system types. Operations like resizing, moving, creating, deleting, merging, and formatting partitions are performed by dragging handles or filling in dialog boxes, with live previews of how the changes will look before anything is committed to disk.
The GUI approach offers several critical safety advantages: operations are queued and reviewed before execution, most tools include built-in backup prompts, undo functionality is available in many cases, and the visual representation makes it far harder to accidentally target the wrong disk or partition.
Windows Built-in Disk Management: Useful but Limited
Windows ships with its own graphical partition management tool called Disk Management (diskmgmt.msc), accessible by right-clicking the Start button. For basic tasks, it is perfectly capable — you can initialize new drives, create, delete, and format partitions, change drive letters, and shrink or extend volumes.
How to Open Windows Disk Management
1
Open via Right-Click Menu
Right-click the Start button (or press Win + X) and select Disk Management.
2
Open via Run Dialog
Press Win + R, type diskmgmt.msc, and press Enter.
3
View Your Drives
The top pane shows volumes with drive letters and sizes. The bottom pane shows physical disks with partition layout visually.
4
Perform Basic Operations
Right-click any partition or unallocated space to access options: New Simple Volume, Shrink Volume, Extend Volume, Format, or Change Drive Letter.
Significant Limitations of Windows Disk Management
While adequate for basic tasks, Windows Disk Management has notable limitations that frustrate users dealing with more complex scenarios:
Windows Disk Management Limitations
For most power-user needs — shrinking C: to create a new partition, migrating an OS to a new SSD, or converting MBR to GPT — a dedicated third-party partition manager is necessary.
MiniTool Partition Wizard: Free vs Pro — Which Do You Actually Need?
MiniTool Partition Wizard is one of the most recognized names in disk management software — and it earns that reputation. The free edition genuinely handles more than Windows Disk Management ever could. But the moment your needs go beyond the basics, you will start bumping into locked doors. Here is an honest breakdown of exactly what you get — and what stays out of reach until you upgrade to MiniTool Partition Wizard Pro.
🔧 Trusted Partition Manager — 40M+ Users
MiniTool Partition Wizard
A polished, feature-rich partition manager that starts free and scales into a professional-grade toolkit. Works on all Windows versions from XP through Windows 11, supporting both HDD and SSD environments.
Resize & Move
Disk Clone
OS Migration
Partition Recovery
MBR ↔ GPT
Disk Benchmark
Space Analyzer
Surface TEst
What the Free Edition Covers
MiniTool Partition Wizard Free is genuinely useful for everyday partition management. It goes meaningfully beyond what Windows Disk Management offers — particularly in its ability to move partitions and merge non-adjacent volumes without data loss. For a home user who simply needs to resize a partition, reclaim wasted space, or convert a file system, the free tier is a legitimate option.
Free Edition — What you Get
Free Edition — What is Locked
MiniTool Partition Wizard Pro — What the Upgrade Unlocks
The jump from Free to Pro is significant. The Pro edition is not simply a “remove ads” upgrade — it adds features that are genuinely essential for anyone doing serious disk work. If you are migrating to a new SSD, recovering a deleted partition, or setting up a Windows 11-ready GPT disk from an old MBR drive, the Pro version is what makes those tasks safe and straightforward.
MiniTool Partition Wizard Pro — Key Upgrades
1
OS Migration to SSD / HDD
Move your entire Windows installation — OS, apps, settings, everything — to a new drive without reinstalling. The wizard handles partition resizing and boot configuration automatically. This alone is worth the upgrade for anyone buying a new SSD.
2
Full Disk & Partition Clone
Create an exact sector-by-sector copy of any disk or individual partition. Essential for drive replacements, upgrades, and creating bootable backup copies of a working system before risky operations.
3
MBR ↔ GPT Conversion Without Wiping
Convert your disk’s partition style between MBR and GPT in-place — all data stays intact. This is the safest path to Windows 11 compatibility on older machines that were running legacy MBR setups.
4
Partition Recovery
Scan a disk for deleted or lost partitions and restore them with their data intact. Recovery rate depends on how much data has been written since deletion — but for recent accidents, results are often impressive.
5
WinPE Bootable Media
Build a bootable USB drive that runs MiniTool outside of Windows. If your OS won’t boot, this is how you manage or rescue partitions on a dead system — a must-have for IT professionals and serious home users.
Free vs Pro — Side-by-Side Comparison
| Feature | Free | Pro |
|---|---|---|
| Create / Delete / Format / Resize | ✓ Included | ✓ Included |
| Move Partitions | ✓ Included | ✓ Included |
| Merge Partitions | ✓ Included | ✓ Included |
| FAT32 → NTFS Conversion | ✓ Included | ✓ Included |
| Disk Benchmark & Space Analyzer | ✓ Included | ✓ Included |
| Surface Test (Bad Sector Check) | ✓ Included | ✓ Included |
| OS Migration to SSD / HDD | ✗ Locked | ✓ Included |
| Disk & Partition Clone | ✗ Locked | ✓ Included |
| MBR ↔ GPT (No Data Loss) | ✗ Locked | ✓ Included |
| Partition Recovery | ✗ Locked | ✓ Included |
| Dynamic → Basic Disk Conversion | ✗ Locked | ✓ Included |
| WinPE Bootable Media | ✗ Locked | ✓ Included |
| Upsell Interruptions During Use | Frequent | None |
Who Should Go Pro? If even one of these applies to you — buying a new SSD, upgrading to Windows 11, recovering a lost partition, or wanting a full bootable backup — MiniTool Partition Wizard Pro pays for itself in the first use. The lifetime license in particular makes it a one-time investment that keeps paying off.

EaseUS Partition Master: The Best Overall Partition Manager
After evaluating the full landscape of partition management software, EaseUS Partition Master stands out as the most complete, user-friendly, and powerful option for Windows users in 2024 — whether you opt for the free edition or the full Professional version.
⭐ Editor’s Choice — Best Partition Manager 2026
EaseUS Partition Master
A comprehensive disk management suite that combines professional-grade partitioning capabilities with an interface clean enough for complete beginners. Trusted by over 100 million users worldwide.
Resize & Move
OS Migration
Disk Clone
MBR ↔ GPT
Partition Recovery
4K Alignment
Disk Health
Merge Partitions
Your drive is messier than you think — wrong partition sizes, wasted space, an OS that won’t migrate, and a disk stuck on outdated MBR. EaseUS Partition Master fixes all of it without touching your data. Resize, clone, recover, and convert partitions with a few clicks — even move your entire Windows installation to a new SSD without reinstalling a thing. Most users are surprised by how much control they never knew they had.
What Makes EaseUS Partition Master Stand Out
EaseUS Partition Master presents your entire disk layout as a horizontal bar graph where partitions are color-coded blocks. Resizing is as simple as dragging the edges of a partition block. The interface provides a “pending operations” queue — you can stack multiple changes, review the complete list, and only apply them all at once with a single click. This preview model dramatically reduces the risk of accidental data loss.
This is arguably the most valuable feature EaseUS offers. When you buy a new SSD and want to move your entire Windows installation to it — keeping all applications, settings, and files intact — EaseUS Partition Master handles the entire process. It clones the system partition, adjusts partition sizes to fit the new drive, and ensures bootability on the destination disk. Doing this manually would require third-party boot tools and significant technical knowledge. EaseUS reduces it to a wizard with a few clicks.
Unlike Windows Disk Management — which requires completely erasing a disk to change its partition style — EaseUS Partition Master can convert between MBR and GPT in-place, with all existing data preserved. This is essential for users upgrading to Windows 11 on a machine that was previously running MBR.
If you have accidentally deleted a partition or it has become corrupted, EaseUS includes a partition recovery wizard that scans the disk and attempts to find and restore lost partition tables. Recovery success depends on whether data has been overwritten, but for recent accidental deletions it is remarkably effective.
When partitions are misaligned with a drive’s physical sector boundaries, SSD performance can drop significantly. EaseUS can check and correct alignment automatically — a feature particularly important when migrating a partition from an older HDD to an NVMe SSD.
The Professional version includes S.M.A.R.T. health monitoring that reads the built-in diagnostic data your drive constantly collects, giving you early warning of potential drive failure before catastrophe strikes.
EaseUS Partition Master Free vs Professional
| Feature | Free Edition | Professional |
|---|---|---|
| Create / Delete / Format / Resize | ✓ Included | ✓ Included |
| Move Partitions | ✓ Included | ✓ Included |
| Merge Partitions | ✓ Included | ✓ Included |
| FAT ↔ NTFS Conversion | ✓ Included | ✓ Included |
| OS Migration to SSD/HDD | Limited | ✓ Full |
| Disk / Partition Clone | ✗ Pro Only | ✓ Included |
| MBR ↔ GPT (No Data Loss) | ✗ Pro Only | ✓ Included |
| Partition Recovery | ✗ Pro Only | ✓ Included |
| 4K Alignment Optimization | ✗ Pro Only | ✓ Included |
| Disk Health (S.M.A.R.T.) | ✗ Pro Only | ✓ Included |
| WinPE Bootable Media | ✗ Pro Only | ✓ Included |
EaseUS Partition Master vs MiniTool vs Windows Disk Management
Let’s put all three options side by side so you can choose the right tool for your specific needs with confidence.
| Capability | Windows Disk Mgmt | MiniTool Free | EaseUS Free | EaseUS Pro |
|---|---|---|---|---|
| Basic Partition Ops | Partial | Yes | Yes | Yes |
| Move Partitions | No | Yes | Yes | Yes |
| Resize Non-Adjacent | No | Yes | Yes | Yes |
| OS Migration to SSD | No | Paid Only | Limited | Full |
| Disk Clone | No | Paid Only | Paid Only | Yes |
| MBR → GPT (no wipe) | No | Paid Only | Paid Only | Yes |
| Partition Recovery | No | Paid Only | Paid Only | Yes |
| UI / Ease of Use | Adequate | Good | Excellent | Excellent |
| Upsell Interruptions | None | Moderate | Minimal | None |
| WinPE Bootable Media | No | Paid Only | Paid Only | Yes |
| Cost | Free | Free / $59+ Pro | Free | ~$29.95/yr |
🏆 Our Verdict: EaseUS Partition Master
For casual users who only need to resize or create partitions, the EaseUS Free edition beats both MiniTool Free and Windows Disk Management — it offers the same capabilities with a cleaner interface and fewer upsell interruptions. For power users, IT professionals, or anyone migrating to a new SSD, the EaseUS Professional edition delivers the most complete feature set at the most competitive price.
Quick Recommendation Summary:
• Just need to resize a partition once? → Windows Disk Management or EaseUS Free
• Regular partition management without spending money? → EaseUS Partition Master Free
• Migrating Windows to a new SSD or cloning a disk? → EaseUS Partition Master Professional
• IT environment needing scripted automation? → diskpart + EaseUS Pro combo