
Feeling burdened by your finances? Taking control of your spending starts with understanding where your money goes. In this first part of our “Budget and Expense Tracking” series, we’ll guide you through the essential steps of setting up your budget tracking system in MS Access, including designing tables to store your financial data and building user-friendly forms to enter your monthly budget and expenses easily.
We have tried to make things simple to learn. The project contains the building blocks of the Database related to Tables, Queries, and Forms in design with advanced features.
Benefits of the Budget and Expense Tracking Project
This project can convert time-consuming and complex manual expense data entry tasks into a risk-free migration that eliminates human errors.
After applying the integration of budget and expense-tracking software any business can gain:
- Automated routine tasks
- Tracking expenditures in real-time
- Mitigate the risk of human errors associated with manual processes to increase productivity
- Saving costs by analyzing
- And position businesses for sustained growth and success.
Tables for Setting Up Your Budget Tracking System
There are 3 tables to be created:
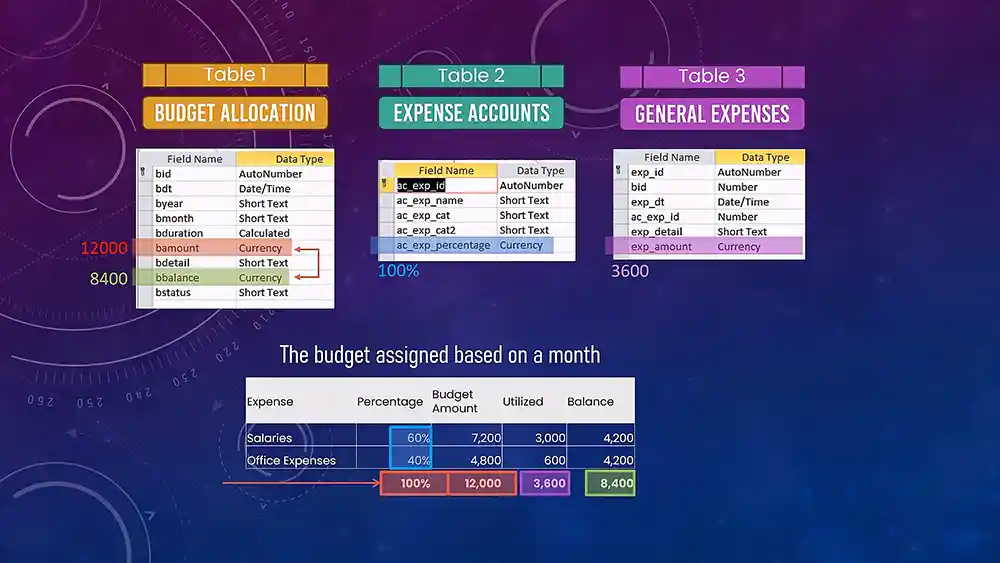
1. Budget Allocation Table
Create the first table related to Budget Allocation which should include these fields:
| Field Name | Data Type | Description |
|---|---|---|
| bid | AutoNumber | Budget ID |
| bdt | Date/Time | Budget Date |
| byear | Short Text | Budget Year |
| bmonth | Short Text | Budget Month |
| bduration | Calculated | Budget Duration |
| bamount | Currency | Budget Amount |
| bdetail | Short Text | Budget Detail |
| bstatus | Short Text | Budget Status |
Budget Allocation Table
The first table we will create out of three tables is about the Budget Allocation which contains a unique ID field of course with the Data Type of Auto Number.
Our budget allocation will depend on the interval of a month, so create the Year and Month selection dropdown and combine them in a third field. The date Serial function will be used in Expression Builder to get the date from the Year and Month fields.
Next, we will require the Amount of the Budget, a detail field, and the remaining balance from the budget field. The Status field will decide whether the month is closed or in open status.
The default value of the Year and Month should be the current year and month. To do this we will use the Format function in the Default Value section of the properties. Ok, now converting the date into the Month and Year format like this.
2. Expense Accounts Table
| Field Name | Data Type | Description |
|---|---|---|
| ac_exp_id | AutoNumber | Expense Account ID |
| ac_exp_name | Short Text | Expense Account Name |
| ac_exp_cat | Short Text | Expense Account Category |
| ac_exp_cat2 | Short Text | Expense Account Category 2 |
| ac_exp_percentage | Number | Expense Account Percentage |
| ac_exp_status | Short Text | Expense Account Status |
Expense Account Table
The second table is related to General Expenses Accounts included in a business to assign a ratio in percentage for each expense. This table contains Expense names with dual categories which we will be used to analyze the expenses later in this project.
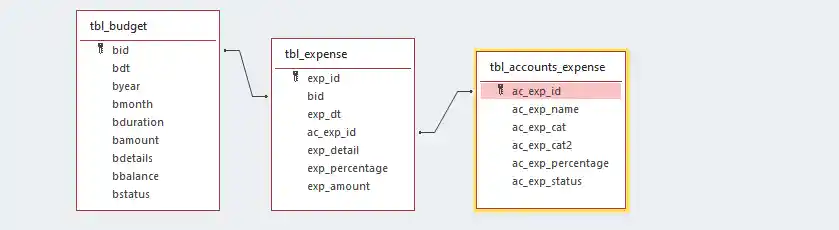
3. Expense Table
| Field Name | Data Type | Description |
|---|---|---|
| exp_id | AutoNumber | Expense ID |
| bid | Number | Budget ID |
| exp_dt | Date/Time | Expense Date |
| ac_exp_id | Number | Expense Account ID |
| exp_detail | Short Text | Expense Detail |
| exp_percentage | Short Text | Expense Percentage |
| exp_amount | Short Text | Expense Amount |
Expense Table
The third table is about the expenses made in the business from time to time. The field name “bid” will be used as a relational ID with the Budget table with a “one to many” relationship. We will use Lookup Wizard for a dropdown of expenses based on the Expenses table that we have created.
Tables Relationships
Most probably all 3 tables should join each other based on the ID and “one to many” relationship like this:
Setting Up the Forms
Form Wizard will help us to create a form based on Table fields. There would be 3 forms to be built
Budget Allocation
The first Form we are creating is about Budget Allocation based on the budget Table.
There are 2 ways to create forms based on either bound or unbound properties. The date can be added or edited from a bound form as you can examine in the form’s preview below. Hence, in our case, each transaction is based on a monthly budget quota with Open or Close status, it is better to use unbound text and combo boxes with an “Add” button to add records to the table to avoid affecting other records.
The “Change” button in the subform with each record is used to change the status of the record to close the month.
All objects including text boxes and buttons must have unique names to use the references in coding. In this project, we are going to use the complete MS Access CRUD functions which are to Create, Read, Update, and Delete functions of the Database.
The final Budget Allocation Form should look like this:

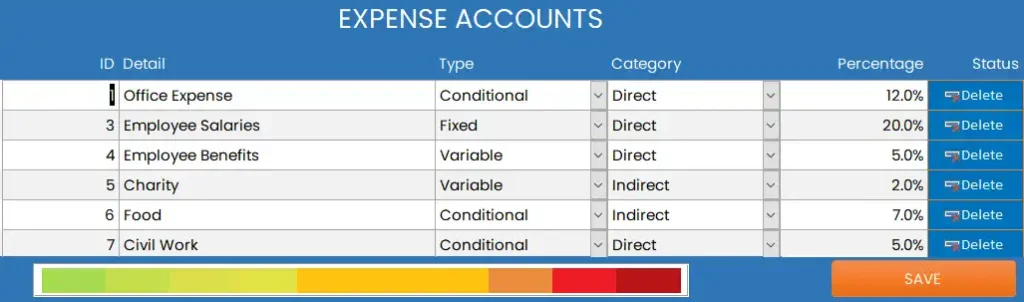
This time, we rely on a bound form based on the expense accounts table so the data can be updated and the percentage can be defined for each expense.
The progress bar will used to indicate the utilization of the budget quota in percentage and only submit the form if the percentage is 100%. Admin may adjust the percentage in between the accounts. We will make it functional in the next posts.
The Delete button will confirm the removal of the account.
With the addition of some data, the form will look like this:
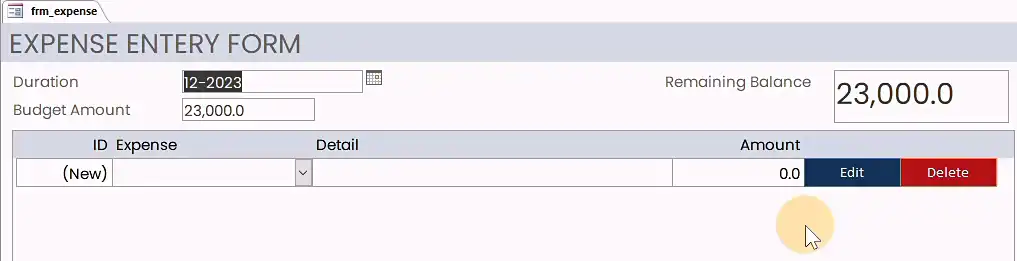
Expense Entry
Create the Expense Data Entry Form which will be based on both Budget and Expense tables.
At this stage, if you have an error related to no relation between tables, you need to establish the one-to-many relationship between tables.
Apply format (“mmm-yy”) to the Duration field. The form contains a SubForm and after design, finally, it will look like this:
If you want to follow along with the video, check out the MS Access Playlist on YouTube by Skill Header, and download the practice files at skillheader.com.