
Inventory and Stock Management is where your data transforms from a simple list into a powerful engine for business intelligence. This module serves as the central nervous system of your software, calculating real-time “Stock on Hand” by automatically balancing every purchase against every sale. By implementing automated stock queries and visual low-stock alerts, you move beyond manual record-keeping into proactive management. This ensures you never miss a sale due to an unexpected stockout or tie up vital capital in excess inventory, making your database a truly professional tool for decision-making.
Explanation with timeline
Inventory Logic Overview: Introduction to how the system calculates “Stock on Hand” using transaction history.
Building the Inventory Main Form: Designing a dashboard-style interface to view all stock levels at a glance.
Stock Query Construction: Creating the “engine” of the module—a complex query that sums all purchases and subtracts all sales.
Stock Status Color Coding: Applying Conditional Formatting to highlight items that are “Out of Stock” or “Low Stock.”
Individual Stock Detail Form: Developing a drill-down form to see the specific movement history of a single item.
Generating Stock Reports: Designing a professional, print-ready report for physical warehouse audits.
Integration: Linking the Inventory module to the main dashboard for quick access.
Detailed Step-by-Step Guide (Part 7: Inventory and Stock Logic)
This installment moves the software into the realm of real-time management. We aren’t just storing product names anymore; we are calculating business value.
The Core Logic: The Stock Query
In accounting, you never just “change” a number for stock. Instead, you record a transaction.
The Calculation
This formula is the mathematical backbone of your inventory system. It calculates exactly what is sitting on your shelves at any given moment by tracking the flow of goods:
Stock on Hand = (Opening Stock + Total Purchases) - Total Sales
- Opening Stock: Your starting balance (what you had when the system began while entering New Item/Product).
- Total Purchases (+): Every new item brought into the warehouse, increasing your count.
- Total Sales (-): Every item sold to a customer, decreasing your count.
Implementation: Direct Stock Update
Instead of calculating the entire history of the business every time you open a form, the system manages stock through event-driven updates:
- Initial Entry: When a new product is first registered, the Opening Stock is entered to set the baseline balance.
- Purchasing (Addition): Stock levels are not affected by “draft” orders. The addition to your inventory happens automatically the moment a Purchase Order (PO) is finalized, ensuring only confirmed stock is counted.
- Sales (Deduction): As soon as a Sale is made, the system triggers a subtraction from the current balance, reflecting the physical movement of goods out of your store.
- Live Balance: This method keeps your database fast and responsive, as the software simply adjusts a single “Current Stock” value during these key transactions rather than re-scanning every invoice ever created.
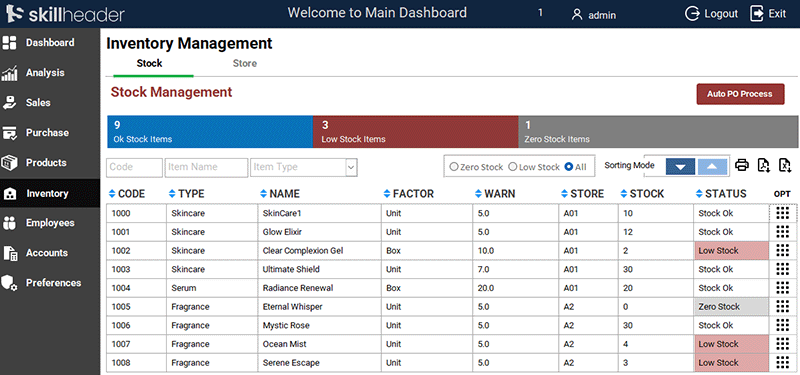
Designing the Inventory Dashboard
The Inventory Main Form acts as a control center.
- Data Presentation: We use a continuous form layout so users can see many items at once.
- Update Query for Arguments: Add a new field with the Expression Builder
StockStatus: IIf([ItmOStock]=0,"Zero Stock",IIf([ItmOStock]<[ItmWarningUnits],"Low Stock","Stock Ok")) - Visual Alerts: We set Conditional Formatting rules:
- Red Background: If
StockStatus = Zero Stock(Out of Stock). - Gray Background: If
StockStatus = Low Stock(Low Stock).
- Red Background: If
- Search Integration: We apply the “Search as you Type” logic learned in Part 6 so managers can find specific items instantly.
The Grouping Frame: One-Click Stock Status
The Grouping Frame acts as a master switch for your inventory list. Instead of looking at hundreds of items, you can instantly isolate the “problem areas” in your warehouse.
- Zero Stock Selection: This filter hides everything except items where the balance is 0 or less. It is used to identify “lost sales” opportunities that need immediate replenishment.
- Low Stock Selection: This filter shows only items that have dropped below their Reorder Level. It serves as a “to-do list” for the purchasing manager to create new orders before the stock runs out.
- All Selection: This is the default view. It removes all status filters so you can see your entire product catalog, regardless of the stock quantity.
Private Sub FrameZeroLowAll_Click()
If Me.FrameZeroLowAll = 1 Then
Dim StZFilter As String
    StZFilter = "[StockStatus]= 'Zero Stock'"
    Me.Form.Filter = StZFilter
    Me.Form.FilterOn = True
    StZFilter = Empty
ElseIf Me.FrameZeroLowAll = 2 Then
Dim StLFilter As String
    StLFilter = "[StockStatus]= 'Low Stock'"
    Me.Form.Filter = StLFilter
    Me.Form.FilterOn = True
    StLFilter = Empty
ElseIf Me.FrameZeroLowAll = 3 Then
Dim StAFilter As String
    Me.Form.Filter = ""
    Me.Form.FilterOn = False
    StAFilter = Empty
End If
End Sub
Grouped Inventory Reporting (By Store)
Instead of a flat list of items, this report uses Grouping Levels to organize products by StoreNm (Store Name).
- Location-Based Auditing: By grouping by
StoreNm, the report generates a clear header for each store location (e.g., “Main Warehouse,” “Retail Branch”). This is essential for physical stock-takes, as employees can count items store-by-store without searching through a disorganized list. - Custom Field Selection: Unlike the form, which shows everything, the report is streamlined. We only select the specific fields needed for a physical audit, such as Item Code, Item Name, and Item Type, Item Factor, Total Items, leaving out technical IDs or background data to keep the page clean.
- Subtotals by Store: Because we are grouping by
StoreNm, we can add a “Group Footer” that automatically sums up the total number of items or the total inventory value for that specific store before moving on to the next one.
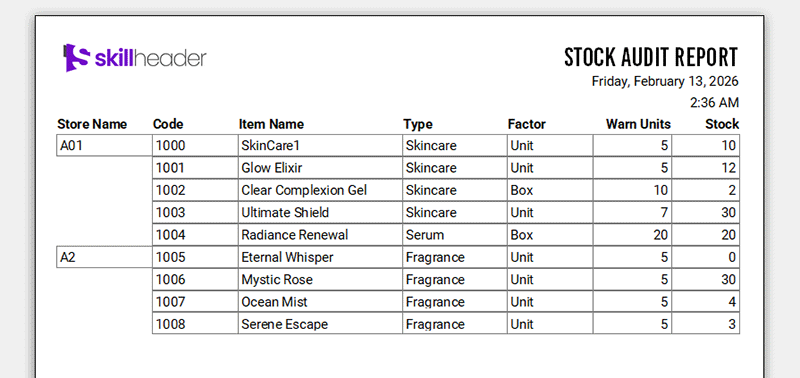
The Result: You get a professional, multi-page document that tells you exactly what you have and where it is located. It bridges the gap between your digital records and the physical reality of your shelves.