
Part 4 begins by enhancing the Admin Dashboard with high-level navigation controls for quick access to core modules, before finalizing the Chart of Account interface. We will establish the Sub or General Accounts to handle internal transactions.
Explanation with timeline
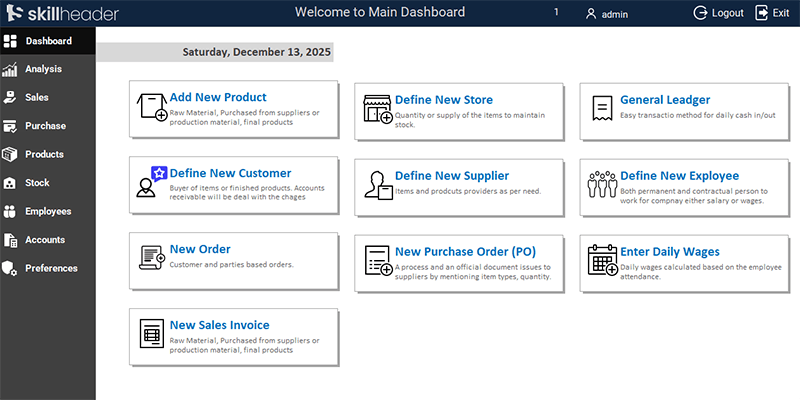
Dashboard UI Enhancement: Improving the color scheme and creating professional navigation “cards” using shadowed rectangles and transparent buttons.
Navigation Control Setup: Designing 10 primary buttons for the dashboard, including Sales, Purchases, GL, and HR modules.
Dynamic System Date: Integrating a textbox with a dynamic date expression and setting the mouse hover effect to “Hyperlink Hand.”
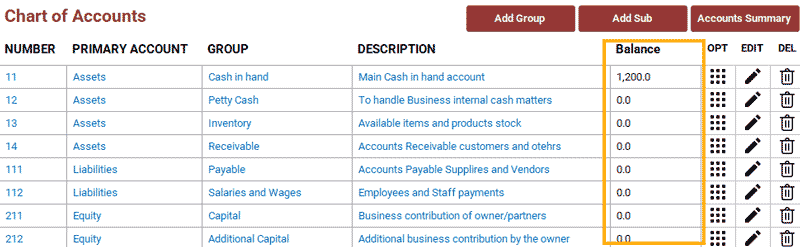
COA Table Update: Adding the Payment field to the main Chart of Accounts table and updating the form with responsive design.
Centralizing Entries: Introducing the Common ID field to centralize associated tables for General Ledger entries.
Add Sub-Account Form: Building a new form with a list box for main account selection and fields for opening balances.
Duplicate Verification Logic: Implementing VBA on the After Update event to verify account names against existing table entries using visual icons.
Submit Logic & Balance Updates: Programming the submit button to refresh the main form and update the balances of the main accounts.
CRM & SRM Foundation: Creating the Customer and Supplier tables and integrating the Common ID field for future ledger tracking.
Detailed Step-by-Step Guide
This fourth part of our masterclass shifts focus toward user experience and deeper financial structure. We will build a professional navigation dashboard and implement the “Sub-Account” layer of our Chart of Accounts.
1. Designing the Admin Dashboard Navigation Hub
A professional dashboard should provide one-click access to the most frequent tasks.
1.1. Creating Navigation “Cards”
Instead of standard buttons, we use a modern “card” design:
- The Base: Draw a Rectangle, set the background to white, and apply a Shadowed effect via the right-click menu.
- The Interaction: Insert an icon and place a Command Button on top. Set the button to Transparent and align the text to the Right.
- The Details: Add a Label below the button title for “Remarks” or category details.
- UX Refinement: Change the Mouse Cursor property to “Hyperlink Hand” and remove button outlines for a clean, web-like feel.
1.2. Core Navigation Modules
Replicate the design for these 10 essential modules:
- Add New Product/Item
- Define New Store
- Define New Customer
- Define New Supplier
- New Order
- New Sales Invoice
- New Purchase Order (PO)
- General Ledger
- Define New Employee
- Enter Daily Wages
1.3. System Date Integration
To keep the dashboard informative, insert a textbox in the header. Use the Expression Builder in the Control Source to set it to =Date(), ensuring the current date is always visible upon login.
2. Refining the Chart of Accounts (COA) Structure
2.1. The Payment Field
Update the Main Chart of Accounts Table by adding a new field: Payment.
- Purpose: This field helps categorize how accounts handle payments.
- Form Update: Add this field to the COA form, adjusting the layout so the description column remains responsive.
2.2. The “Common ID” Concept
This is a critical architectural step. We introduce a Common ID (AcCommonID) field. This field will serve as the “anchor” that links General Ledger entries across various associated tables (Customers, Suppliers, etc.), ensuring data integrity during complex transactions.
3. Sub-Account Management (frm_AddSubAccount)
While we have main account groups, a business needs specific sub-accounts (e.g., specific bank names under the “Cash” group).
3.1. Form Interface
- Selection: Use a List Box to display all main accounts. A list box is preferred over a dropdown here because it allows the user to see the full hierarchy of main accounts at once.
- Data Entry: Create textboxes for Account Name, Opening Balance, and Description.

3.2. Duplicate Verification Logic (VBA)
To prevent creating the same sub-account twice, we use two icons (Check/Cross) that respond to user input.
- Event: Use the
After Updateevent of the Account Name textbox. - Logic: The code checks the table for the entered text. If a match is found, the Cross icon appears; otherwise, the Check icon is shown.
Private Sub txtAccName_AfterUpdate()
'Define a variable to store DCOUNT value
AG = DCount("AcSubNm", "tbl_ChartOfAccountsSub", "AcSubNm= '" & Me.txtAccName & "'")

If AG = 0 Then
    Me.imgGNOk.Visible = False
    Me.imgGOk.Visible = True
        ElseIf AG > 0 Then
            Me.imgGNOk.Visible = True
            Me.imgGOk.Visible = False
End If
End Sub
3.3. Submit Button & Balance Updates
The Submit button executes the following logic:
- Column Mapping: Identifies the correct Main Account ID from the List Box column.
- Data Insertion: Saves the new sub-account record.
- Balance Calculation: Triggers a logic update to ensure the parent account’s balance correctly reflects the new sub-account’s opening balance.
- UI Refresh: Calls the Popup Alert (created in Part 3) and refreshes the main COA form to show the new entry.
Private Sub CmdSubmitAddSubAccount_Click()
'Mandaroty fields check to be filled
If IsNull(Me.ListSelectGroup) = True Or IsNull(Me.txtAccName) = True Then
    MsgBox "Mandatory fields must be filled.", vbExclamation, "|Empty Fields|"
    Exit Sub
        Else
            If Me.imgGNOk.Visible = True Then
            MsgBox "The Group name already exitst.", vbCritical, "|Not Allowed|"
            Exit Sub
                Else
                    LAcNumber = Me.ListSelectGroup.Column(1)
                    If DCount("*", "tbl_ChartofaccountsSub", "accid=" & LAcNumber) = 0 Then
                        'The first record of the account
                        AcGLc = LAcNumber & "01"
                    Else
                        'Addition of 1 if previous account found
                        AcGLc = DLast("AcCommonID", "tbl_ChartofaccountsSub", "AccID=" & LAcNumber) + 1
                    End If

                    'Proceeding to insert data into the table
                    Set rst = CurrentDb.OpenRecordset("tbl_ChartofaccountsSub", dbOpenDynaset, dbSeeChanges)
                    With rst
                        .AddNew
                        .Fields("AccID") = LAcNumber
                        .Fields("AcCommonID") = AcGLc
                        .Fields("AcSubDt") = Date
                        .Fields("AcSubNm") = Me.txtAccName
                        .Fields("AcSubBalance") = Nz(Me.txtAccOpening, 0)
                        .Fields("AcSubDetail") = Me.txtAccDescription
                        .Update
                    End With
                    Set rst = Nothing

                    'Updating Chart of Accounts
                    Dim rstBalAcc As Recordset
                    Set rstBalAcc = CurrentDb.OpenRecordset("tbl_ChartOfAccounts", dbOpenDynaset, dbSeeChanges)
                        With rstBalAcc
                            .FindFirst "AccNumber = " & LAcNumber
                            .Edit
                            .Fields("AccBalance") = .Fields("AccBalance") + Me.txtAccOpening
                            .Update
                        End With
                        Set rstBalAcc = Nothing

                        'Close the form
                        DoCmd.Close acForm, "frm_addSubAccount"

                        '\\\MsgPopup
                        DoCmd.OpenForm "frm_msgpopup"
                        Forms!frm_msgpopup.Form.LblMsgPopup.Caption = "General Account has been created..."

                        'Refresh the data in the Main form
                        Forms!MainDashboard!NavigationSubform.Form.Requery
            End If
End If
End Sub
4. Creating Customer and Supplier Tables
Finally, we establish the tables for our business partners:
- Customer Table: Includes fields for contact info and the Common ID.
| Field Name | Data Type | Purpose |
|---|---|---|
CID | AutoNumber (Primary Key) | Unique ID for the Customers entry. |
AcCommonID | Number | ID to link all general ledger entries |
CName | Text | Customer Name |
CCompany | Text | Customer Company name |
CContactPerson | Text | Person to be contacted |
CEmail | Text | Customer Email address |
CCity | Currency | City of the customer’s business |
CAddress | Text | Address of the customer’s business |
CShipmentPersonName | Text | Name of the person who will receive the products |
CShipmentContact | Text | Contact number of the receiver |
CShipmentEmail | Text | Email address of the receiver |
CShipmentCity | Text | City where goods will be shipped |
CShipmentAddress | Text | Address where goods will be shipped |
CPaymentMothod | Text | Customer’s payment method |
CPaymentTerms | Text | Payment terms |
CBalance | Currency | Customer Balance |
CLastPaymentDate | Date/Time | Customer last payment date |
- Supplier Table: Copy the Customer table structure, then update field names and details to fit procurement needs.
| Field Name | Data Type | Purpose |
|---|---|---|
SID | AutoNumber (Primary Key) | Unique ID for the Supplier entry. |
AcCommonID | Number | ID to link all general ledger entries |
SName | Text | Supplier Name |
SCompany | Text | Supplier Company name |
SContactPerson | Text | Person to be contacted |
SEmail | Text | Supplier Email address |
SCity | Currency | City of the supplier’s business |
SAddress | Text | Address of the supplier’s business |
SShipmentPersonName | Text | Name of the person who will dispatch the products |
SShipmentContact | Text | Contact number of the sender |
SShipmentEmail | Text | Email address of the sender |
SShipmentCity | Text | City where goods will be shipped |
SShipmentAddress | Text | Address where goods will be shipped |
SPaymentMothod | Text | Payment method decided for Supplier |
SPaymentTerms | Text | Payment terms |
SBalance | Currency | Supplier Balance |
SLastPaymentDate | Date/Time | Supplier last payment date |
By the end of this session, your dashboard is functional, and your Chart of Accounts is ready to handle detailed sub-account transactions.