
Part 3 is the pivotal step where the Chart of Accounts (COA), the backbone of the financial system, is built, along with an innovative custom pop-up alert system.
Explanation with timeline
1. The Chart of Accounts Database Structure:
- Parent Table (
tbl_ChartOfAccounts): Defines the five primary types: Assets, Liabilities, Equity, Revenue, and Expenses. - Child Table (tbl_ChartOfAccountsSUB): Contains specific accounts (
Account Number,Name,Balance) and includes a Foreign Key (AccID) linking it to the Parent table. - A One-to-Many Relationship is established between the two tables.
2. Building the ‘Chart of Accounts’ Form:
- The
frm_ChartOfAccountsto be build in Continuous Subform bound to thetbl_ChartOfAccounts.
3. Building the ‘Add Group Account’ Form:
- The
frm_AddGroupAccountis set to open in Dialog Mode. - Account Number Generation: VBA code on the Primary Type List Box’s
On Clickevent uses theDMaxfunction to find the largest existing account number under the selected type and adds1for the new unique number. - Duplicate Check: Code on the Account Name’s
After Updateevent checks for existing duplicate names under the same primary type and provides instant visual feedback via icons. - Submit Validation: The Submit button checks mandatory fields and validates that the duplicate-check icon is not visible before insertion.
4. Creating the Modern Pop-up Alert System:
- A custom form (
Alert_frm) is designed with a Label for the message and a set of 20 hidden boxes for the animation. - The form’s
On Timerevent drives the animation by sequentially making the 20 boxes visible, pausing, and then closing the form. This custom form is used to replace all standard Access message boxes.
Detailed Step-by-Step Guide
This part establishes the Chart of Accounts (COA) and an innovative, universal custom pop-up alert system for professional user feedback.
1. The Chart of Accounts Database Structure
Step 1: The Parent Table (tbl_ChartOfAccounts)
| Field Name | Data Type | Purpose |
|---|---|---|
AccID | AutoNumber (Primary Key) | Unique ID for the log entry. |
AccNumber | Number | Account Number |
AccName | Text | Name of the primary type (e.g., ‘Assets’, ‘Liabilities’). |
AccGroup | Text | Group or Category of the Accounts |
AccDescription | Text | A description of the Account. |
AccType | Text | Type of Account (e.g., ‘Builtin’ for default accounts |
AccBalance | Currency | Opening Balance amount of the account |
Step 2: The Child Table (tbl_ChartOfAccountsSUB)
| Field Name | Data Type | Purpose |
|---|---|---|
AccSubID | AutoNumber (Primary Key) | Unique ID for the log entry. |
AccID | Number (Foreign Key) | Links to the parent account ‘tbl_ChartOfAccounts’ |
AccCommonID | Number | Name of the primary type (e.g., ‘Assets’, ‘Liabilities’). |
AccSubID | Text | Group or Category of the Accounts |
AccSubNm | Text | A description of the Account. |
AccSubDetail | Text | Type of Account (e.g., ‘Builtin’ for default accounts |
AccSubBalance | Currency | Opening Balance amount of the account |
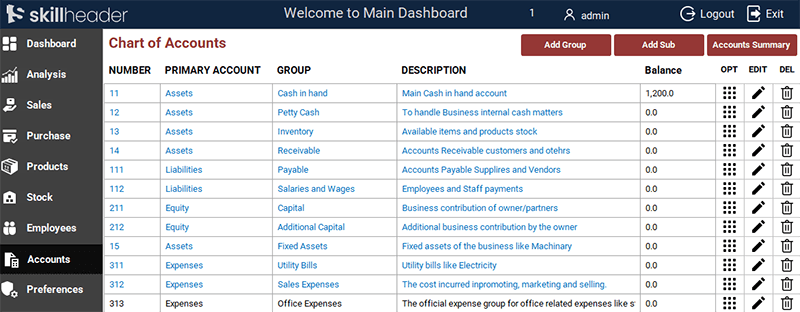
2. Building the ‘Chart of Accounts’ Form (frm_ChartOfAccounts)
Step 3: Creating the Chart of Accounts Form (frm_ChartOfAccounts)
- A new form (
frm_ChartOfAccounts) is created as a Continuous Subform bound to thetbl_ChartOfAccounts. - The form’s records are explicitly Disabled to prevent accidental editing, making it a read-only list.
- This form is integrated as a Subform into the Accounts tab.
3. Building the ‘Add Group Account’ Form (frm_AddGroupAccount)
Step 4: VBA Logic for Auto-Incrementing Account Number
- Event: Code is triggered by the
On Clickevent of the Primary Account List Box. - Function: It uses the
DMaxfunction to find the largest existing account number (Numberfield) associated with the selectedAccount_ID. - Calculation: It adds
1to the maximum value found to generate the new, unique account number.
Private Sub ListSelectPrimary_Click()
    'Actually we need to add Primary account number
    Me.txtGroupNumber = DMax("AccNumber", "tbl_ChartOfAccounts", "AccName= '" & Me.ListSelectPrimary & "'") + 1
End Sub
Step 5: Checking for Duplicate Account Names
- Event: The code is triggered by the
After Updateevent of the Account Group Name text box. - Function: A check is performed for an existing record matching both the entered
Nameand the selectedAccount_ID. - Visual Feedback: An icon is instantly displayed (e.g., a Cross Icon) if a duplicate is found, which is linked to the submission validation.
Private Sub txtAccGroup_AfterUpdate()
'Define a variable to store DCOUNT value
AG = DCount("AccGroup", "tbl_ChartOfAccounts", "AccGroup = '" & Me.txtAccGroup & "'")

If AG = 0 Then
    Me.CmdGnok.Visible = False
    Me.CmdGok.Visible = True
        ElseIf AG > 0 Then
            Me.CmdGnok.Visible = True
            Me.CmdGok.Visible = False
End If
End Sub
Step 6: Submit Button Validation and Insertion
The Submit button’s VBA code ensures data is clean: checks mandatory fields, blocks submission if the duplicate icon is visible, inserts the data, and then refreshes the main COA display form.
Private Sub cmdAddGroupSubmit_Click()
'Madatory fields check to be filled
If IsNull(Me.ListSelectPrimary) = True Or IsNull(Me.txtAccGroup) = True Then
    MsgBox "Mandatory fields must be filled.", vbExclamation, "|Empty Fields|"
    Exit Sub
        Else
            If Me.CmdGnok.Visible = True Then
                MsgBox "The Group name already exists.", vbCritical, "|Not Allowed|"
                Exit Sub
                    Else
                        'Proceeding to insert data into the table
                        Set rst = CurrentDb.OpenRecordset("tbl_ChartOfAccounts", dbOpenDynaset, dbSeeChanges)
                        With rst
                            .AddNew
                            .Fields("AccNumber") = Me.txtGroupNumber
                            .Fields("AccName") = Me.ListSelectPrimary
                            .Fields("AccGroup") = Me.txtAccGroup
                            .Fields("AccDescription") = Me.txtAccDescription
                            'Let the Type empty other than Builtin
                            .Update
                        End With
                        Set rst = Nothing

                        'MsgBox "The Account has been created successfully.", vbInformation, "|Account Created|"
                        DoCmd.Close acForm, "frm_AddGroupAccount"

                        '\\\MsgPopup
                        DoCmd.OpenForm "frm_msgpopup"
                        Forms!frm_msgpopup.Form.LblMsgPopup.Caption = "Account has been created..."

                        'Refresh the data in the Main form
                        Forms!MainDashboard!NavigationSubform.Form.Requery
            End If
End If
End Sub3. Creating the Modern Pop-up Alert System 🔔
Step 7: Designing the Pop-up Form (Alert_frm)
- Create a small, Unbound Form designed to open as a dedicated pop-up.
- Animation Elements: The key is placing a large number (e.g., 20) of identically sized, small controls (boxes) around the central message area. These are initially hidden.

Step 8: The Timer Event VBA Logic (The Animation)
- Timer Counter: A hidden variable or control tracks the animation progress.
- Show/Hide Logic: The code on the form’s
On Timerevent sequentially makes the 20 hidden boxes visible to create a fade-in effect. - Pause and Close: The counter continues for a set duration to pause the alert on screen before the code finally closes the pop-up form. This form can be called universally for all successful submissions.
Private Sub Form_Timer()
If Me.txtMsgCount = 50 Then
    DoCmd.Close acForm, "frm_msgPopup"
    Else
        Me.txtMsgCount = Me.txtMsgCount + 1
    If Me.txtMsgCount = 2 Then
        Me.BxP1.Visible = True

    ElseIf Me.txtMsgCount = 3 Then
        Me.BxP2.Visible = True

    ElseIf Me.txtMsgCount = 4 Then
        Me.BxP3.Visible = True

    ElseIf Me.txtMsgCount = 5 Then
        Me.BxP4.Visible = True

    ElseIf Me.txtMsgCount = 6 Then
        Me.BxP5.Visible = True

    ElseIf Me.txtMsgCount = 7 Then
        Me.BxP6.Visible = True

    ElseIf Me.txtMsgCount = 8 Then
        Me.BxP7.Visible = True

    ElseIf Me.txtMsgCount = 9 Then
        Me.BxP8.Visible = True

    ElseIf Me.txtMsgCount = 10 Then
        Me.BxP9.Visible = True

    ElseIf Me.txtMsgCount = 11 Then
        Me.BxP10.Visible = True

    ElseIf Me.txtMsgCount = 12 Then
        Me.BxP11.Visible = True

    ElseIf Me.txtMsgCount = 13 Then
        Me.BxP12.Visible = True

    ElseIf Me.txtMsgCount = 14 Then
        Me.BxP13.Visible = True

    ElseIf Me.txtMsgCount = 15 Then
        Me.BxP14.Visible = True

    ElseIf Me.txtMsgCount = 16 Then
        Me.BxP15.Visible = True

    ElseIf Me.txtMsgCount = 17 Then
        Me.BxP16.Visible = True

    ElseIf Me.txtMsgCount = 18 Then
        Me.BxP17.Visible = True

    ElseIf Me.txtMsgCount = 19 Then
        Me.BxP18.Visible = True

    ElseIf Me.txtMsgCount = 20 Then
        Me.BxP19.Visible = True

    ElseIf Me.txtMsgCount = 21 Then
        Me.BxP20.Visible = True
End If
End If
End Sub